Friday, January 28, 2011

Experimenting a simple DC Motor Driver

Simple DC Motor Driver
This simple DC motor driver circuit uses a 741 operational amplifier operating as a voltage follower where its non inverting input is connected to the speed and rotation direction of a potentiometer VR1. When VR1 is at mid position, the op-amp output is near zero and both Q1 and Q2 is OFF.
When VR1 is turned towards the positive supply side, the output will go positive voltage and Q1 will supply the current to the motor and Q2 will be OFF. When VR1 is turned to the negative supply side, the op-amp output switches to the negative voltage and Q1 will turn OFF and Q2 ON which reverses the rotation of the motor's direction.
As the potentiometer VR1 is moved toward either end, the speed increases in whichever direction it is turning.
The TIP3055 Q1 NPN power transistor has a collector current specs of 15A and VCE0 of 60V DC.
The MJE34 Q2 PNP power transistor has a collector current specs of 10A and VCE0 of 40V DC.


Parts List


Source : Extracted from Popular Electronics Nov 1997, By Charles D. Rakes

ref: electronics-project-design.com/DCMotorDriver.html

Thursday, January 27, 2011

Auto Shut Off Tone Generator


Auto Shut Off Tone Generator
In this auto shut off tone generator project, once the switch to the 9V power supply is connected, the alarm will trigger at a frequency of approximately 1.27 kHz. It will remain ON for a duration of approximately 170 seconds or 2.8 minutes before it stopped. This is a typical home burglar alarm system
of which once the alarm is triggered ON, it will not be shut OFF until the duration of time set has elapsed. This project is useful when built as one can carry it along wherever one goes or placed it in a vehicle. In times of emergency, one can easily switched ON the switch and the loud speaker will emit a loud sound that will frighten the uninvited guest.

Schematic Diagram
The schematic of the tone generator is as shown below.


It is based on two 555 timer ICs or one single 556 timer IC(which contains two 555 timers). In this schematic, two 555 timers are used. U2 is configured as a timer in astable mode. Once triggered, it will emit a frequency from its output at pin 3 that will drive a Q1 transistor. Q1 transistor will turn ON and OFF according to the frequency of the circuit. It will in turn used to drive a 8 ohm loud speaker to emit a loud audible sound.
The astable frequency of circuit U2 is given by the formula of 555 timer as shown below.

f = 1.44/[47K + 2(33K)][10nF]

= 1.27 kHz


The frequency of the sound can be adjusted by changing the values of R3= 47K, R4= 33K and capacitor C1=10nF. Change the values of these components and by using the formula for astable mode, the frequency of the sound can be obtained.

U1 circuit is used as a delay circuit which is configured as a monostable mode. It is a one shot multivibrator that will generate a pulse at its output at pin 3 which will disable the astable circuit U1. In this circuit, pin 2 of U1 will go to logic 0 when the power supply is connected via the capacitor E1 and hence circuit U2 is immediately triggered.
The pulse duration of the monostable circuit is given by the formula:

T = 1.1(330K)(470uF)

= 170 seconds

Once this timing is up, it the pulse output will disable the astable circuit of U2.


Tone Generator Parts List


ref: electronics-project-design.com/ToneGenerator.html


Tuesday, January 25, 2011

DC Servo Motor

DC Servo Motor Basics
A Servo Motor is a small device that has an output shaft which can be positioned to specific angular positions by sending the servo a Pulse Coded Modulation signal. As the coded signal changes, the angular position of the shaft changes. DC servo motors are used in radio controlled airplanes, radio controlled cars, robots and a host of other applications that one can think of. A picture of a servo motor is as shown below.


Though the servo is small in size, it has a printed circuit board with control circuit built in and a standard servo manufactured by Futaba is model S3003. The power consumed is proportional to the mechanical load, thus saving energy when it is used in a varying type of load. The servo motor consist of a motor, gears and its casing. Three wires are used to interface to other control circuitry which are +5V DC, Ground and Control Signal.
It is using a control called proportional control of which the amount of power applied to the motor is proportional to the distance it needs to travel. This means that if the shaft needs to turn a large distance, the motor will run at higher speed. Usually a servo is used to control an angular motion of between 0 and 180 degrees.
The servo expects to see a pulse every 20 milliseconds (.02 seconds). The length of the pulse will determine how far the motor turns. A 1.5 millisecond pulse, for example, will make the motor turn to the 90 degree position (often called the neutral position). If the pulse is shorter than 1.5 ms, then the motor will turn the shaft to closer to 0 degress. If the pulse is longer than 1.5ms, the shaft turns closer to 180 degress.

DC Servo Motor Driver Circuit Description
The input signals are between 0 - 5V delivered by connecting up the 10K potentiometers as voltage dividers. The Microchip PIC 16C71 has an AD converter that changes the voltage signal into the Pulse Code Modulation system used by the servo motors. This signal is a 5V pulse between 1 and 2 msec long repeated 50 times per second. The width of the pulse determines the position of the server. Most servos will move to the center of their travel when they receive a 1.5msec pulse. One extreme of motion generally equates to a pulse width of 1.0msec; the other extreme to 2.0msec with a smooth variation throughout the range, and neutral at 1.5msec.
It will be a good experience to experiment the control of servo motors in this project by doing your own software programming using PIC 16C71 microcontroller.


Parts List Of Servo Motor Driver


ref: electronics-project-design.com/DCservoMotor.html

Temperature Switch Project


Temperature Switch Project
This project will provide you an understanding of the use of germanium diode and how it works compared to the more common silicon diode. It works on the principle that as the temperature surrounding the germanium diode increases, the back resistance decreases sharply.
At room temperature, the germanium diode D1 has a typical back resistance of 10K ohm. At this value, the base of transistor Q1 is turned ON, causing transistor Q2 to turn ON as well. When this happens, the base of transistor Q3 is kept to ground causing it to turn OFF hence the buzzer is OFF.
When the temperature of the surrounding increases, the back resistance of the germanium diode D1 decreases sharply causing the base of transistor Q1 to pull down to near ground potential. This cause the transistors Q1 and Q2 to turn OFF. Transistor Q3 is now forward bias through resistor R2 and diode D2. This caused the buzzer to turn ON indicating that the ambient temperature has risen. The sensitivity of the circuit can be adjusted by adjusting variable resistor VR1 and subjecting diode D1 to a temperature that will trigger the buzzer.


Schematic Diagram
The schematic of the project is as shown below.


Parts List


ref:  electronics-project-design.com/temperatureswitch.html

Contact [BlogMaster]


Ali Nisar
Cell: +92 333 523 3223
Email: alinisar01@hotmail.com
___________________________

Tuesday, January 18, 2011

Smart Antennas

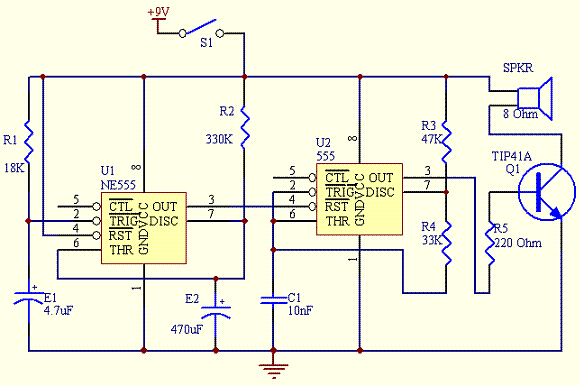
What is a Smart Antenna?

Smart Antennas, also known as multiple antennas, adaptive array antennas, and so on is used to increase the efficiency in digital wireless communication systems. It works by taking the advantage of the diversity effect at the transceiver of the wireless system that is the source and the destination. The term diversity effect refers to the transmission and reception of multiple radio frequencies that are used to decrease the error during data communication and also to increase data speed between the source and the destination.
This type of technology has already found its significance in most of the wireless communication systems as special antenna arrays are used with signal processing algorithms which can easily locate and track the different wireless targets such as mobiles. It is also used to calculate the beam forming vectors and the direction of arrival [DOA] of the signal.


Difference between Conventional Antenna and Smart Antenna

The main difference is related with the way both the systems deal with the problems caused by multipath wave propagation. When a wireless signal is sent to a large distance it may have to pass many barriers like tall buildings, mountains, utility wires and so on. Thus these signals’ wave fronts will be scattered and will take multiple paths to reach the receiver. In a conventional wi-fi communication system, a method called single input single output [SISO] is used, that is one antenna will be connected to the source and another one will be connected to the destination. When the signals arrive late at the destination, they may arrive faded, cut-out and also with common communication problems like picket fencing. This is one of the basic problems of a SISO system. Thus if we use SISO system in a internet connection, the data will arrive late and that too erroneous in nature. All these problems can be solved with the help of Smart Antennas.


Smart Antenna – Functions

A smart antenna has mainly two basic functions. They are explained in detail below.
1. Estimation of Direction of arrival (DOA)
In smart antennas various techniques like MUSIC (Multiple Signal Classification) and estimation of signal parameters via rotational invariance techniques (ESPRIT) algorithms are used to find the DOA of a signal. This method requires a lot of computations and algorithms. Even Matrix Pencil method is commonly used in smart arrays to find the DOA. Matrix Pencil method is more commonly used in real time systems as they are highly efficient than the other two. The antenna acts like a sensor in which a spatial spectrum of the array is selected and the DOA is found out from the peaks of this spectrum.
2. Beamforming Method
The mobiles or targets at which the signals are to be sent are first sought out and then a radiation pattern of the antenna array is created by adding the signal phases. At the same time the mobiles which will not need the signal will be out of pattern. Though this method may seem a little to complicated, it can be done easily with the help of a FIR tapped delay line filter. According to the signal used the weight of the FIR filter can also be changed accordingly. The filters will also be helpful in providing optical beamforming so as to decrease the MMSE between the actual and wanted beam pattern that is formed.


Types of Smart Antennas

The classification of Smart Antennas depends on the type of environment and the requirements of the system. There are mainly two types of Smart Antennas. They are
1. Phased Array/Beam Smart/Multi-beam Antenna
In this type of array, there will be numerous amount of fixed beams amongst which one beam will turn on or will be steered towards the wanted signal. This can be done only with the help of adjustment in the phase. In other words, as the wanted target moves, the beam will also be steered. The figure of  a phased array antenna is shown below.
Phased Array Antenna
IMAGE FROM
2. Adaptive Array Antenna
In this type of antenna, there will be a change in the beam pattern according to the movement of the wanted user and the movement of the interference. The signals that are received will be weighted and later combined to increase the wanted signal to interference in addition to the noise and power ratio [S/N]. Thus, the direction of interference will be balanced as the wanted signal will be in the direction of the main beam.
The antenna can easily steer the main beam to any direction, while at the same time nullifying the interfering signal. The direction of the beam can be calculated using the DOA method. The figure of an adaptive array antenna is shown below. Take a look.
Adaptive Array Antennas
Another way of categorizing smart antennas is in the number of inputs and outputs that is used for the device. According t this classification the categories are given below.
1. SIMO (Single Input – Multiple Output)
In this method one antenna will be used at the source and multiple antennas will be used at the destination.
2. MISO (Multiple Input – Single Output)
In this method, multiple antennas will be used at the source and only one antenna will be used at the receiver.
3. MIMO (Multiple Input – Multiple Output)
In this method multiple antennas will be used at both the source and the destination. This is the most efficient method amongst all. This method was extended recently in accordance to the IEEE 802.11n standard. This method clearly supports spatial information processing.


Advantages

  • Both beam smart and adaptive arrays provide high efficiency and thus high power for the desired signal. When a large number of antenna elements are used at a higher frequency, Beam Smart antennas use narrow pencil beams. Thus high efficiency is obtained in the direction of the desired signal. If a fixed number of antenna elements are used the same amount times the power gain will be produced with the help of adaptive array antennas.
  • Another advantage is in the amount of interference that is suppressed. Beam smart antennas suppress it with the narrow beam and adaptive array antennas suppress the interference by adjusting the beam pattern.


Disadvantages

The main disadvantages are
  • Cost
The cost of such a device will be more, not only in the electronics section, but also in the power. That is the device is way too expensive [especially if MIMO methods are used.], and will also decrease the life of battery of mobiles. The receiver chains that are used must be reduced in order to reduce the cost. Also the costs rise up due to the RF electronics and A/D converter used for each antenna.
  • Size
For this method to be efficient large base stations are needed. This will increase the size. Apart from this multiple external antennas are needed on each terminal. This is not practical. But companies re trying methods like dual polarization to reduce the size.
  • Diversity
When multiple mitigation is needed, diversity becomes a big problem. The terminals and base stations must have multiple antennas. There are mainly three types of diversities. They are spatial, polarization, and angle.
Spatial separation of the antennas that are used is practically impossible when it is applied on mobile phones. It is also difficult to be achieved in point-to-point systems where a near line-of-sight exists between the transmitter and receiver. By using polarized diversity, the above problem can be avoided to a certain point. Dual polarization can be easily instigated without the use of spatial separation.
Angular diversity is the most commonly used method nowadays. The signals which have the maximum signal power are selected from multiple beams and are used to maintain diversity. But the gain depends on the angular spread. That is, if the spread is small, the diversity will also be small.
  • Tracking
  • Spatial-temporal processing
  • Hooks in international
  • standards to include provisions for smart antennas
  • Vertical integration

Read more: http://www.circuitstoday.com/smart-antennas#ixzz1BNsX3f5p
Under Creative Commons License: Attribution

Friday, January 14, 2011

Construct an Electronic Lock

This project provides the schematic and the parts list needed to construct a very simple Electronic Lock. It is a simple project and will help the beginners to electronics to understand the one of the function of flip flops and their application.
A typical dual type D flip-flop features are as described below.

The MC14013B dual type D flip–flop is constructed with MOS P–channel and N–channel enhancement mode devices in a single monolithic structure. Each flip–flop has independent Data, (D), Direct Set, (S), Direct Reset, (R), and Clock (C) inputs and complementary outputs (Q and Q). These devices may be used as shift register elements or as type T flip–flops for counter and toggle applications.
• Static Operation
• Diode Protection on All Inputs
• Supply Voltage Range = 3.0 Vdc to 18 Vdc
• Logic Edge–Clocked Flip–Flop Design
Logic state is retained indefinitely with clock level either high or low; information is transferred to the output only on the positive–going edge of the clock pulse
• Capable of Driving Two Low–power TTL Loads or One Low–power Schottky TTL Load Over the Rated Temperature Range
• Pin–for–Pin Replacement for CD4013B


This is a pre determined hardwire type of combination lock that will trigger a relay in response to a right sequence of 4 numbers keyed in on the remote keypad. Pressing other keys will reset the electronic lock.

You can find the CK210 Electronic Lock kit here under the SURVEILLANCE AND SECURITY (SPY) category.

ref: electronics-project-design.com/ElectronicLock.html

Phone Line In Use Indicator

Introduction
The function of this fun electronic project design is to indicate whether a phone line that is connected to many phone extension is in use or otherwise. It is an interesting project for beginners to electronics hobby as there are only a few commonly available parts that are used in this circuit.
Circuit Description


The main part of this project is the use of an N channel power MOSFET IRF511 that has a current rating of 5.0 A at room temperature and drain to source voltage of 60V. If the phone is offhook, it will have a tip to ring voltage of 48V DC. When this voltage is applied to the gate of Q1, it will turn Q1 ON which in turn will bias the Q2 transistor to turn OFF. When Q2 is OFF, LED will also be OFF which means that the phone line is not in use.
When the phone hook is remove, the voltage will drop and cause Q1 to turn OFF. When Q1 is OFF, the gate of Q2 will be biased ON and thus transistor Q2 will turn ON. When Q2 turn ON, LED will also turn ON indicating that the phone line is in use.

Phone Circuit Parts List


Source : Extracted from Popular Electronics Feb 1993, By Charles D. Rakes

ref: electronics-project-design.com/fun-electronic-project.html